Trailer weekend


#1

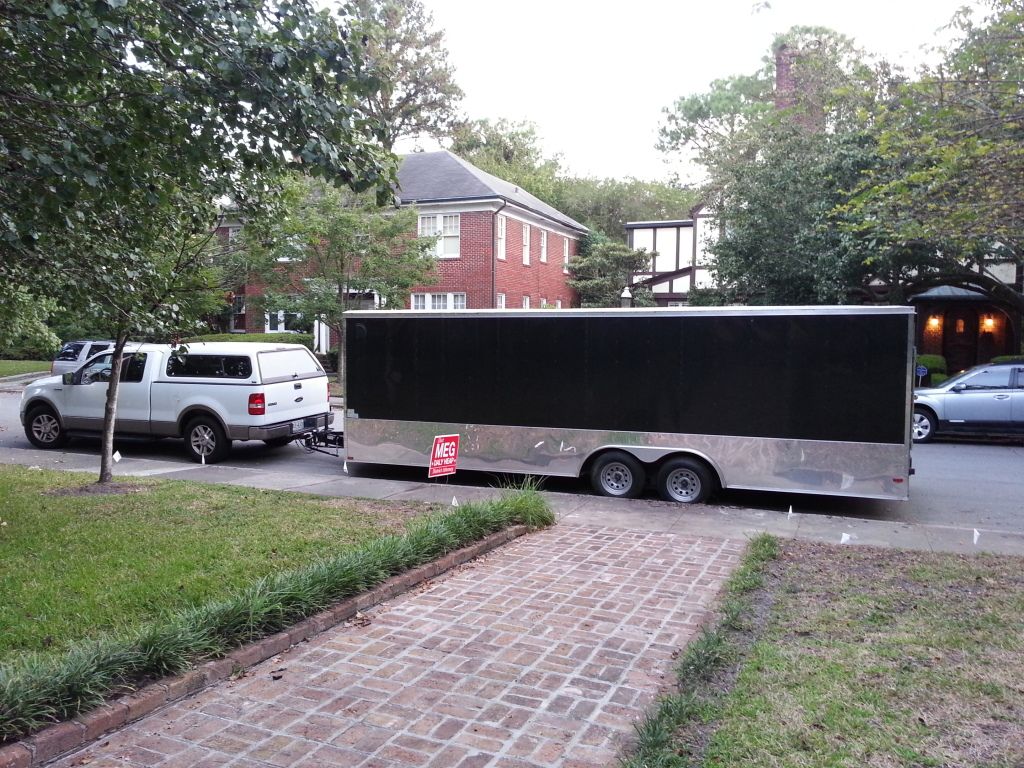
At Road Atl last month I finally resolved to get an enclosed trailer. I found a killer local deal on a year old 24’ and with Rich Bratton’s help I got the trailer. It needed some repairs and as luck would have it the trailer repair place was only a couple hundred meters away. I finally got the trailer back a couple days ago so this weekend was the first time I really “had” the trailer. The first project was to paint it.

Friday evening was spent cleaning and masking. Lots and lots of cleaning. After consulting with “The Home Depot Lady”, I had a gallon of exterior latex for the walls, and a gallon of some acrylic for the floor. “Home Depot Lady” said that both would give me about twice the coverage I needed, but I figured that if I only bought a couple quarts I’d probably just run out and have to head back to Home Depot.

HD Lady also said that epoxy paint, my original plan for the floor, was a nogo because it wouldn’t adhere to the wood. Her recommendation was an acrylic latex, because altho it might have trouble with hot tires and 2500lbs, in general terms the acrylic latex could be trusted to bond with wood pretty well.

A couple weeks ago I’d bought a paint sprayer off of CL for precisely this task. And once it quit working I borrowed the neighbors paint sprayer, sigh. The neighbor married to Glock chick (http://spece30.com/forum/16-general-discussion/42615-late-night-wrenching-pass-the-glock-pls). Who’s already complaining about my trailer being parked in front of the house btw. It wasn’t there for 18hrs before she started complaining. Sheeze.

To my surprise my gallon of exterior latex only seemed to get about half of the job done so I had to head back to HD for another gallon. It took the paint sprayer about 5min to burn thru that and then I was struck by just how much the walls really needed a 2nd coat. So I went back to HD for another 2gal of paint. I burned right thru that additional 2qts and didn’t have a drop left. The next time HD lady says that a gallon will be plenty I’m going to buy one of those 5gal tubs.

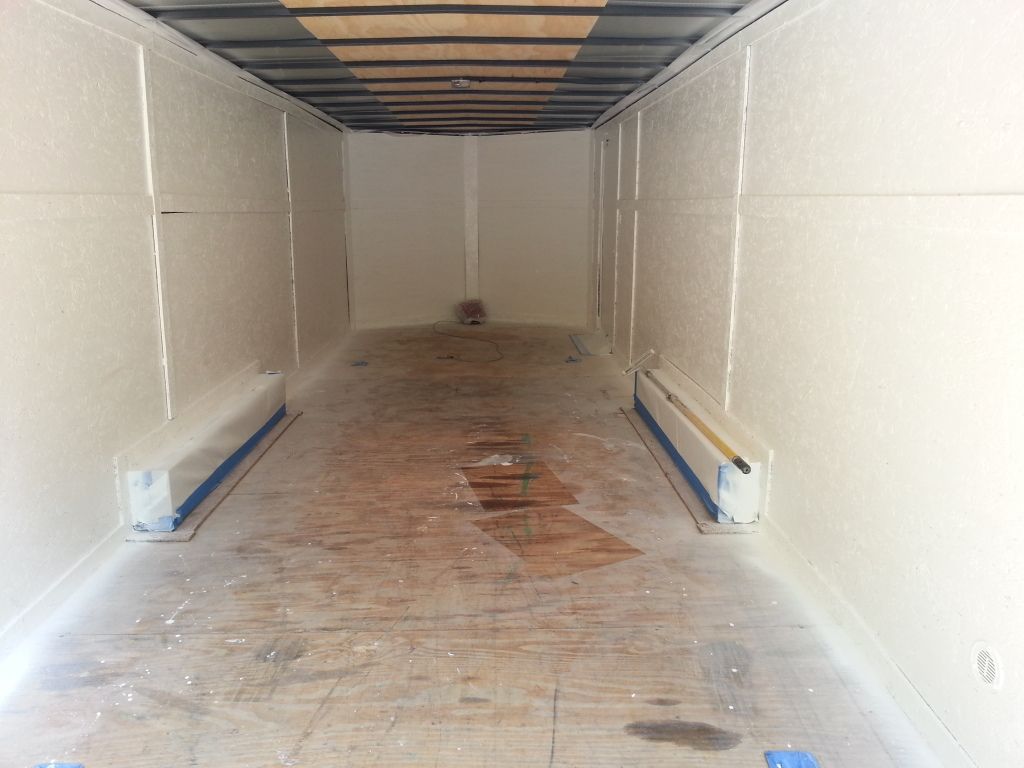
Saturday afternoon #1 son and I got down on our hands and knees and scrubbed the whole damned 24x8.5’ floor. There were oil patches and dirt in the plywood that had to come out. It was a lot of work.

I started having second thoughts about the acrylic latex on the floor. I looked up some old threads a bf.c and resolved that “the Internet knew better” than HD Lady. So I bought some epoxy garage floor paint and some primer to help it stick to the wood. I also got some sand to add traction to the epoxy paint, and some colored speckles to make it all look pretty.

Early this morning I put a coat of primer on the trailer floor. The first coat of epoxy went on in the early afternoon and then I installed the HF weight dist hitch. That effort went unusually smoothly. I probably used up a month’s worth of luck with the painless install of the hitch.

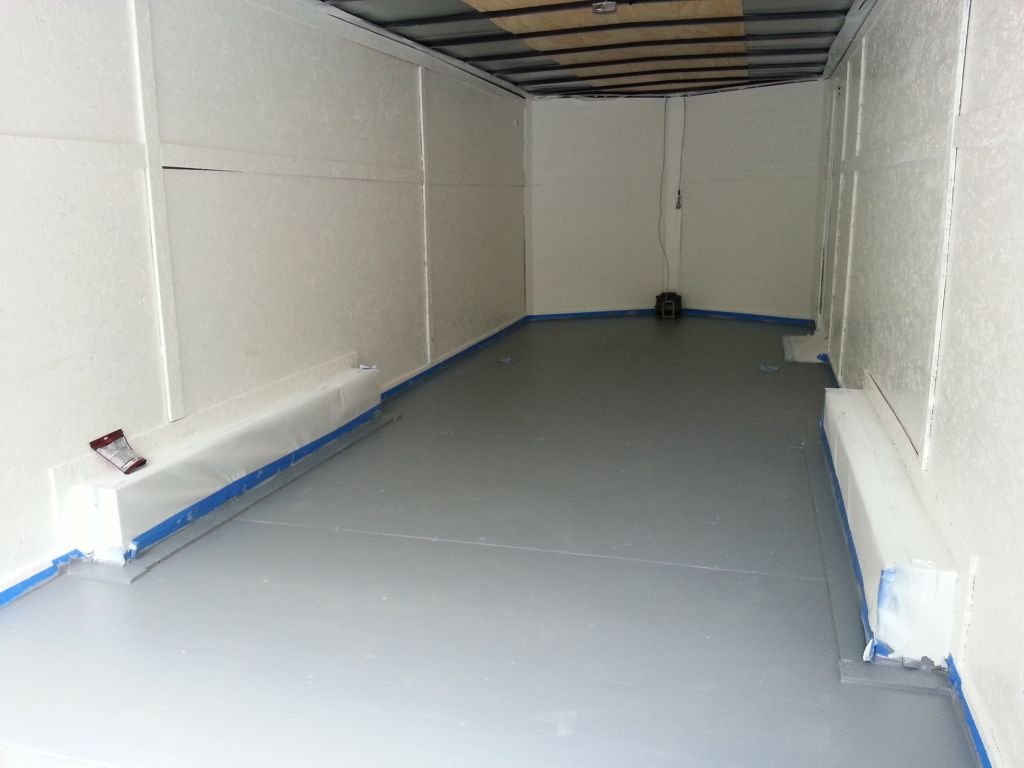
The 2nd coat of epoxy went on the trailer floor around dinner time. I was supposed to let it dry overnight but it seemed plenty dry so I drove on. Wife wants the trailer gone and I figured if I finish tonight I can get the trailer out of the neighborhood one day sooner.

I put some sand in the epoxy paint just prior to putting the 2nd coat on. It’s some stuff that was next to the garage floor paint, I didn’t just shake out the kid’s beach toys. About each 25 sqft of progress I’d toss the colored speckles on to the floor because I’m such a class act.

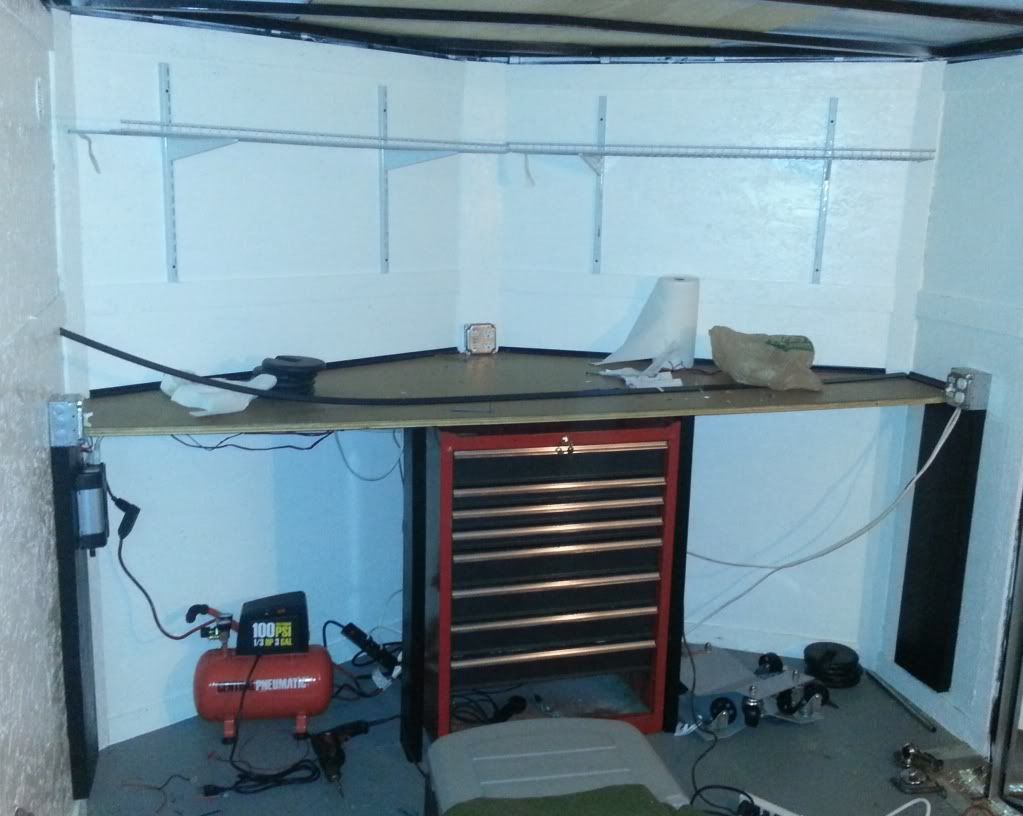
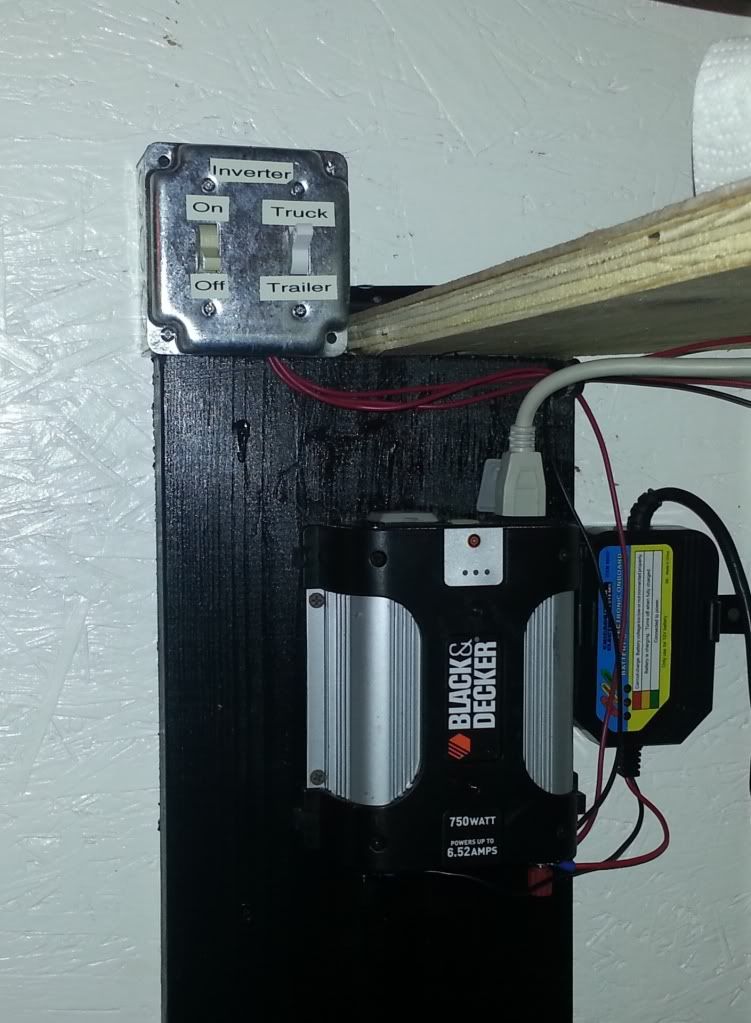
Next trailer weekend I’ll do something about a work table, wire in the winch, and put something on the floor for the car’s wheels to rest on.


#2

I spent much of the Thanksgiving holidays working on the trailer. The family was off visiting the inlaws in CT so I had more time for projects than I’d have since #1 son arrived 9yrs ago. It was awesome.

The table was a bit tricky because it’s a pretty complicated shape. You’d think a table that took 14" of trailer length plus the V nose would have 5 sides, but the walls of the trailer are not squared off. Instead each of the corners are rounded off by a vertical strip of wood. So instead of 5 sides it has, surprisingly, 8 sides. That was some careful measuring of the thick plywood. The height of tool chest drove the height of the table. Once the big piece of plywood fit well, it was used as a pattern to cut the hardboard that would be the table’s surface.

The next trick was the center brace. First I had to figure out if the big tool box was going to go under the table, and if so…where. My first inclination had been to put the toolbox somewhere else in the trailer, but eventually I had to accept that there just wasn’t room anywhere else. So, ok, if the toolbox needs to go under the table, where should it go? Eventually I decided to center the toolbox under table for no better reason than the charm of symmetry. So having created a table height that allowed the toolbox to fit nicely underneath, I next put in center table legs that would go on each side of the toolbox.

After the plywood table was fastened all around the hardboard was glued on top. This provided a smooth durable top surface and also covered all of the screws going thru the plywood. Then I painted the table support structure and molding black. I have a strip of black molding that will go on the table’s front edge too.

Before the toolbox, a cheap CL find, went into place I had to replace it’s busted out lock. The lock was necessary because it would prevent the doors from opening up while on the road. Getting the right generic lock required a couple trips to Home Depot.

Then one of my screw-ups became clear. The trailer came with a winch in the center of the V nose. The winch wasn’t electrically hooked up yet, the electrical work would start the next day, but the toolbox in the center was going to block out that winch big time. Crap.

My idea for rescuing the winch vs. toolbox debacle was to remove the bottom drawer of the toolbox and cut a hole in the back of it for the cable to pass thru. That idea worked out very well. Which, I emphasize, is not always the case. The toolbox has plenty of drawers remaining with the bottom one gone so it’s be no big loss. When it came time to hook up the winch to battery power it, to my surprise, worked. I was on a roll.

The biggest effort was electrical. I wanted to be able to easily switch between paddock power, and via an inverter, truck battery power and trailer battery power. I wanted a big battery in the trailer, and I wanted that battery to charge whenever I hooked to paddock power or vehicle power. The devil was in the details.

The easy way to wire the trailer such that either it’s battery or the truck battery would provide 12V was to just connect the two. But that created a scenario where the trailer’s battery would drain into the truck if the truck was connected but turned off. Conversely, I wanted the running truck to charge the trailer’s battery. So on the same wire… current one direction good, current the reverse direction bad.

I also found that the combo of battery charger and inverter pulled 20mA if I left them connected to a battery. That meant that there needed to be an easy way to isolate both the vehicle battery and trailer battery from the charger and invertor, but not isolated from the trailer lighting that was going to be 12V.

I ended up going thru a mess of ideas, each of which sponsored it’s own trip to Home Depot. I also started running out of time as the Thanksgiving Holidays started drawing to a close. I ended up getting everything up and working, but I didn’t have time to work out all the features I wanted.

Trailer has a big-ass battery.

Whenever I’m connected to Paddock power the trailer battery will charge.

Invertor source is switchable between truck battery and trailer battery.

Invertor is isolated by an on/off switch. I found that the invertor was pulling 200ma even when off. I didn’t want this to drain truck or trailer battery.

Each of the two AC plug-in junction boxes has a switch on it for invertor source or paddock power source.

What I didn’t get done:

  1. Lights. I got some 12V LED lights that I’ll run off of the inverter input. That’ll mean which ever power source is selected at the inverter will automatically become the source for the lighting. The lights run on 4.5V so I figured I’d put rechargeable batteries in them and then run the 3 in series off of 12V. Because of the rechargeable batteries in each light, they will each get roughly the voltage they are designed for, and as an added bonus their own rechargeable batteries will stay topped up.

  2. The winch runs off truck power but isn’t hooked up for trailer power. It would be more elegant for there to be one central place to switch everything between truck power and trailer power. The winch is the flaw with having the 12V source switch at the invertor input.

  3. The truck won’t charge the trailer battery. Only paddock power charges the battery. I’m pretty sure I can resolve this with a spare relay or a power diode. The relay is a little more complicated but at least it doesn’t cause a voltage drop. I’ll play with the diodes when they show up and see how much V drop I’d have to suck up. The data sheet says half a volt which would the truck a lousy way to charge the trailer battery. I could put in a relay that connects truck power to trailer power ONLY when truck power is hot. That way when the truck is off the trailer battery can’t drain into the truck. No voltage drop across a relay.

Not pictured is the shelves, handwashing station and fastening contraption I made for the spare trailer tires.

The bad news is that keeping the trailer at the house most of the week sure pissed off the neighbors. So now everyone’s mad at me, to include #1 wife. Glock chick is spitting fury.


#3

Nice writeup, but is there a #2 wife (and do they each know about the other???)


#4

Hand washing station?


#5

May need to install bullet-proofing in the walls in case Glock Chick cuts loose while you have the trailer at home.


#6

My goal is to do track events like you do. Handwashing station, tool box, air compressor, awning, and a wife that shows up at events with snacks and drinks.

A problem with my lighting idea got resolved tonight. The LED lights from Harbor Freight were perfectly workable solutions except that I couldn’t centrally control them. They each had a momentary switch that would have had me stumbling thru the darkness to find the first one and turn the damned thing on.

Tonight I pulled one apart to get to the circuit board housing the switch. With a little poking around with a multimeter it became quickly clear how to bypass the switch. A couple minutes with a soldering iron and it was done. There will be no rechargeable batteries in them now, but they’ll all connect to the light switch by the door.

I’ll do the mod on the other two and bring enough wire to RA to hook them all up. It’s pretty damned sad that in order to work on my trailer I have to wait until the weekend and then take it 6hrs away.


#7

Dang, are all my stories so forgettable? I’m the one that had the Glock. All she had that night was fury. Well, and a front site at center mass.


#8

[quote=“Ranger” post=69508]

A problem with my lighting idea got resolved tonight. The LED lights from Harbor Freight were perfectly workable solutions except that I couldn’t centrally control them…[/quote]

Unless Harbor Freight sponsors you why do you risk injury daily to use dangerous tools. It’s not even a joking matter. Harbor Freight will kill you one of these days!


#9

Yes but it will kill him CHEAPLY so there’s enough left over for a really nice wake. Come over to the dark side Turbo :evil:


#10

Speaking of Harbor Freight, has anyone seen their recent flyer? :laugh:

http://www.flutterby.com/images/2012/10/01/hf_tool_sale.pdf


#11

Dammit! I bought a baker’s shit ton of those carpenter’s dreidels at the last sale for $3 more. I machine 'em down into bleeder screws with decreasing diameters so when I break one off, I can just thread the next one into the snapped off head. Sort of like matryoshka dolls.