The New Ranger 6 Build Thread


#21

[quote=“Ranger” post=61809]@Trackrat. At this point I don’t know. I just need to get the column lower and securely located. How I get there is still up in the air.
[/quote]

What I did was to pull the two bolts on the steering column, cut spacers out of heavy wall tubing and put longer grade 5 bolts in. Easy and solid - no issues with any sort of play and it put the wheel down where I want it. Here’s a shot of the spacers:


#22

I think it was closer to three hours. Most of the time was removing stuff from the car prior to doing the cutting. I had a thicker piece of steel welded over my sunroof hole as my panel had rust damage. The shop that did it didn’t spend enough time doing the welding and warped my roof pretty bad, but I like knowing that I have a solid roof that won’t leak.


#23

[quote=“TrackRat” post=61826][quote=“Ranger” post=61809]@Trackrat. At this point I don’t know. I just need to get the column lower and securely located. How I get there is still up in the air.
[/quote]

What I did was to pull the two bolts on the steering column, cut spacers out of heavy wall tubing and put longer grade 5 bolts in. Easy and solid - no issues with any sort of play and it put the wheel down where I want it. Here’s a shot of the spacers:

[/quote]

Love this solution.

As far as belts are concerned, RCI Platinum belts are what I had on my 944. SFI but come with a certificate to get them re-certified for 2 additional years.


#24

For belts (and seats), I’m using the Ultra Shield belts. Cost is low and quality and performance is very good. I ran them in my previous car as well.


#25

[quote=“Ranger” post=61809]
Before I paint the cage tho, I have to deal with the sunroof. It’s going to come out and I’m going to skin it and weld brakets for it to the cage. If I’m unable to skin the SOB than I’ll slap a piece of sheet steel on top.[/quote]
Similar situation for me, when the 401 was built the complete sunroof (sans motor) was left in the car. 6 years later I’m finally motivated to remove it. I’ve never pulled a sunroof before, and having cage in place I assume is a further complication. Can someone point to a basic how-to on the best method (illustrated even better?)


#26

I swear I remember seeing a detailed thread here with pics of someone’s struggles in removing the sunroof after the cage was installed. I can’t find it, but I know it has been done. It’s basically the same as the normal procedure, only even more annoying. Cutting things into smaller chunks, etc.

http://www.spece30.com/forum/53-body/16182-sunroof-cassette-removal

http://www.spece30.com/forum/12-interiorsafety/13956-replacing-sunroof?limit=10&start=10#20183

Hey, you even replied to that second one.


#27

[quote=“TrackRat” post=61826][quote=“Ranger” post=61809]@Trackrat. At this point I don’t know. I just need to get the column lower and securely located. How I get there is still up in the air.
[/quote]

What I did was to pull the two bolts on the steering column, cut spacers out of heavy wall tubing and put longer grade 5 bolts in. Easy and solid - no issues with any sort of play and it put the wheel down where I want it. Here’s a shot of the spacers:

[/quote]
I’ve not got the steering column lowered and mounted, mostly because I’m noise limited. I’m not allowed to make much noise after 9PM for fear of shooting my cute little neighbor. That makes sense, really. And the direction I’m going with imagineering for this requires some fab work.

You replaced the vert bolts and I’m probably going to replace the horiz bolts that are above. I was able to get the horiz bolts out but the vertical bolts kicked my ass. I couldn’t get a grinder in there to cut a slot or a flat on the bolt w/o chewing the heck out of the flange that they are bolted thru. I’m not sure I could get a nut welded on to one of them either. It wasn’t that hard to grind off the horiz bolts so I went with that.

The pic shows the work on the roof. The holes that the cage builder made already had steel plugs in them, but they were barely tacked in. I welded them in more solidly, and managed a damned poor job of it. By the time I figured out that I needed to turn the power down on the welder I’d made lots of holes in sheetmetal.

There’s a lot of holes in the roof made by bolts that had fastened the sunroof in place, and there’s other spots where I removed paint down to bare metal because little rust pimples were breaking thru. I’ll get this all bondo’d up and pretty.

I’m going to try to skin the sunroof and then fasten it to tabs welded on to the cage. If that goes poorly I’ll just take the piece of sheetmetal from the roof of Old #6 and put it on the new car.


#28

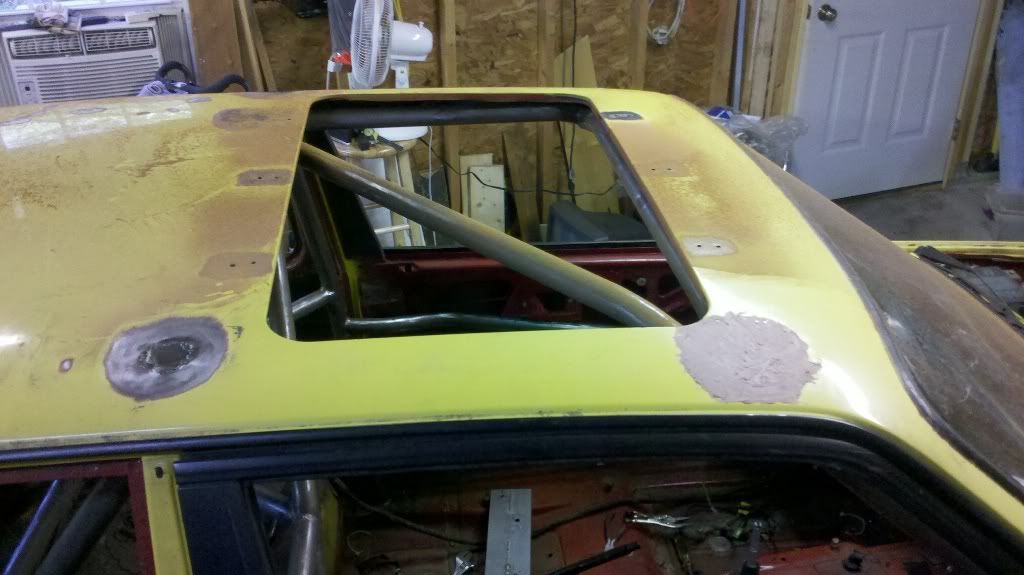
The sunroof cassette is held in by adhesive, two straps on each side welded to the car body, and several spot welds around the sides and front of the sunroof opening. The spot welds present the biggest problem as they are hard to find and you won’t know that you have missed one until the rest of the cassette is free, in which case you will probably bend he roof. You really don’t want to bend the roof (been there done that and it is a bitch to fix).

I’ve learned to simply cut that lip leaving 1/18-3/16" sticking down from the roof. That completely eliminates the spot welds. Then cut the straps on each side and only the adhesive will be holding the cassette in. If you are lucky age will have taken it’s toll on the adhesive and gentle prying will cause it to release. If not apply heat and pry.

This is pretty easy to do with no cage in the way. But with a cage in the car, getting to the side side straps will be difficult. I’d be sorely tempted to saw through the roof to cut the straps and then weld up the cuts. And then once the cassette is free you’ll have to cut it into sections to get it out of the car.

I like to skin and weld in the sunroof panel. To accomplish that I wrap the area where the gasket was with 1/18" steel rod as a filler, holding it on with tack welds. The top of the rod wants to be just slightly the upper surface of the panel. Then I remove the inner skin. With a helper on one side of the car holding that side of the panel flush I align one corner and tack it, then do the other corner. I then move to the other side of the car and tack those corners. The tack welds go from the filler rod to the roof and will mostly be below the surface of the roof.

If all went well, the panel will wind up flush with the roof all around. If not cut the errant tack weld, realign, and weld. Place tack welds every inch or so around the seam (from the panel to the rod and from the rod to the roof). When welding don’t work your way around the seam, but rather skip all over until all the welds are in place to avoid heat distortion. Grind down any protruding weld beads and fill the gap. To fill the gap I wrap tape around the seam inside of the car to form a dam for the filler. I fill the gap with metal filled body filler. It won’t absorb water and cause rusting under the paint and it is stronger and less likely to crank than bondo. Finish flush with body filler, sand, paint, and it will be as if the car never had a sunroof (from the outside).

It will be a little while, but I’m going to do this on the spare car and probably on the 325is I’m restoring. Maybe I’ll remember to document the process with pictures.


#29

[quote=“Ranger” post=61875]
You replaced the vert bolts and I’m probably going to replace the horiz bolts that are above. I was able to get the horiz bolts out but the vertical bolts kicked my ass. I couldn’t get a grinder in there to cut a slot or a flat on the bolt w/o chewing the heck out of the flange that they are bolted thru. [/quote]

The vertical bolts have nuts captive on a retaining plate on the top. I sprayed each with a little PB Blaster and let them sit for a little bit. From there the bolts came out pretty easy. I did have to use a wrench on the top nut and socket the bolt.


#30

I was able to fill in the gaps with a TIG. Using a MIG will be a lot easier. I didn’t use any rod in between. I mean I didn’t wrap arround the roof. I of course used a steel filler rod while TIG welding. I balenced it on the bar that goes through the center and stitch welded it up. I covered the gaps with aluminum foil tape and painted over them.


#31

Finished wirebrushing cage and cage feet. This took a long time. Cleaned the heck out of the cage and cage feet and than painted whole thing with OSPHO rust convertor. Tomorrow cage painting starts.

Finished steering column adapters and installed. Drop is 1.5"

Removed more paint around the holes in the roof, put some more welds on to the plugs in the roof, and slapped some bondo on. There were also some rust pimples that got attention.

Tried hard to get battery to cooperate with a compression test. Decided battery was toast and swapped in battery from old #6.

Did compression test. Engine seems good. 140, 140, 138, 139, 136, 136. Nice surprise.


#32

Bondo doesn’t belong on a race car! Just throw some paint over it. When you can’t pound the dent out anymore that means it’s good enough. Bondo is for used cars that you would never sell to anyone that you might ever see again. In fact it doesn’t really belong on any car.


#33

.The work on the cage continues. I did a lot of cleaning off of the OSPHO residue with a green pad, and applied a bit more of the stuff to places it looked like I might have missed. The OSPHO treatment takes 24hrs to do it’s magic and dry out so a couple iterations of “touch-up” is now in it’s 4th day. The paint on the cage is going to look crappy unless I do a lot of work smoothing the cage bar surfaces post this OSPHO stuff. Finishing the cage is going to have to wait tho. We’re off to the In-laws in CT tomorrow morning tho so new #6 is going to be on hold for a week. Which is no way to run an obsession.

I noted last night that the rear sway is OEM. That means that the pickup points are unreinforced and the rear sway will have to be swapped over from Old #6. The pickup points may become a moot point if I swap the subframe from Old to New #6 because the trailing arms will come with. A charm of that swap is that my newish rear wheel bearings and rear wheel studs will come along with the subframe.

I finally decided on a new paint scheme. I changed my mind on this so many times that I’d do any schoolgirl proud. It won’t be a desert vehicle neutral color theme after all. I decided that the neutral color idea would look visually “blah” and that race cars should be eye-catchers.

If I had to guess I’d say that I’m going to be back on the track with a primo SpecE30 for about $1500. I’m going to be able to sell enough stuff to make up for the purchase price of New #6. I have to buy a new harness. I choose to buy a paint job, multi-pass radiator, replace perfectly serviceable OEM engine mounts with something harder, and all new die-cut decals.

A really cherry SpecE30 for $1500. Hard to complain about that.


#34

So what is this eye-catching scheme going to be?


#35

[quote=“TrackRat” post=61982][quote]
I decided that the neutral color idea would look visually “blah” and that race cars should be eye-catchers.
[/quote]

So what is this eye-catching scheme going to be?[/quote]
It’s a secret. I have to build up tension for the triumphant return of #6, you see.


#36

[quote=“Ranger” post=61986][quote=“TrackRat” post=61982][quote]
I decided that the neutral color idea would look visually “blah” and that race cars should be eye-catchers.
[/quote]

So what is this eye-catching scheme going to be?[/quote]
It’s a secret. I have to build up tension for the triumphant return of #6, you see.[/quote]
I read that as that you still haven’t decided what to do.


#37

With the buildup of the new Avengers movie being in synch with the much-anticipated #6 debut, it is clear that Scott has signed a sponsorship deal with Marvel. Stan Lee was spotted “vacationing” in Savannah last week. :whistle:


#38

Scott

I would be willing to bet the rear subframe and/or trailing arms from the #6 are BENT.

Seriously, I would not consider using them.

AL


#39

Yikes. Good thing I’m getting the hell out of here. :stuck_out_tongue:


#40

[quote=“FARTBREF” post=62002]Scott

I would be willing to bet the rear subframe and/or trailing arms from the #6 are BENT.

Seriously, I would not consider using them.

AL[/quote]
Really? That’d be a bummer. Anyone else want to chime in on the idea of rear suspension being damaged by a hard front hit?

I’m off to the in-laws house in CT so no more work for a week.

Wed night, the night before day 1 of the roadtrip, the 11hrs leg to WA DC, I decided that the surface of the cage bars, roughened by the OSPHO stuff, was unnacceptable. So I wirebrushed on it until 2AM. With all patina of rust converted by the chemical, it’s now coming out pretty well. It’ll take another 4hrs of work go get it all tho. Then I’ll paint the damned thing. The cage that is.

The paint, as I mentioned before, is a cheap alternative to highly abrasive resistant, and costly POR15.